3790 lượt xem
5 cách để mở khóa ổ cứng mã hóa BitLocker trong Windows 10. Thông thường, ổ đĩa được mã hóa BitLocker sẽ tự động bị khóa mỗi khi bạn kết nối nó với máy tính hoặc khởi động lại máy tính. Vì vậy, trừ khi bạn đã bật tính năng tự động mở khóa cho ổ đĩa được mã hóa BitLocker của mình , bạn phải mở khóa theo cách thủ công để truy cập các tệp bên trong. Trong bài viết này, chúng tôi sẽ chỉ cho bạn năm cách khác nhau để mở khóa ổ đĩa được mã hóa BitLocker trong Windows 10.
Lưu ý: Dù sử dụng phương pháp nào, bạn cũng phải có mật khẩu, thẻ thông minh hoặc khóa khôi phục. Nếu bạn không có bất kỳ tệp nào trong số chúng, bạn sẽ không thể mở khóa ổ đĩa được mã hóa BitLocker.
Nội dung chính:
Có 5 cách để mở khóa ổ cứng mã hóa BitLocker
Cụ thể như sau:
- Cách 1: Từ File Explorer
- Cách 2: Từ Bảng điều khiển
- Cách 3: Sử dụng iSumsoft BitLocker Reader
- Cách 4: Sử dụng Command Prompt
- Cách 5: Sử dụng Windows PowerShell
Cách 1: Mở khóa ổ đĩa được mã hóa BitLocker từ File Explorer
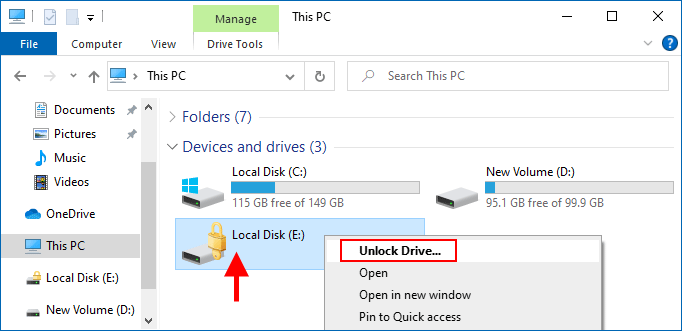
Bước 1: Mở File Explorer và truy cập This PC. Xác định vị trí ổ cứng được mã hóa BitLocker bằng ổ khóa màu vàng, sau đó bấm đúp vào nó hoặc bấm chuột phải vào nó và chọn Mở khóa ổ .
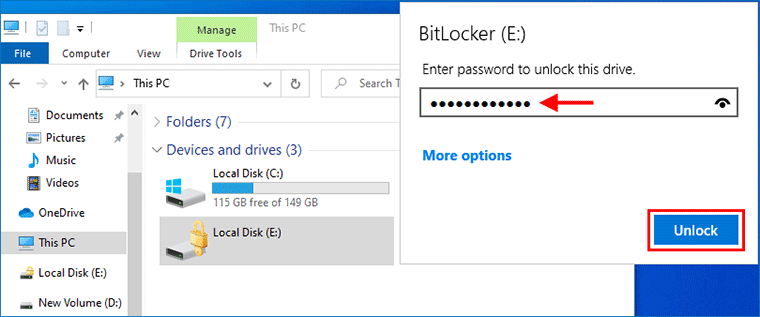
Bước 2: Một cửa sổ BitLocker nhỏ xuất hiện ở góc trên bên phải màn hình, yêu cầu bạn nhập mã khóa để mở khóa ổ đĩa này. Nhập mật khẩu BitLocker hoặc khóa khôi phục của bạn, sau đó nhấp vào Mở khóa . Ổ đĩa sẽ được mở khóa ngay lập tức.
Cách 2: Mở khóa ổ đĩa được mã hóa BitLocker từ Bảng điều khiển
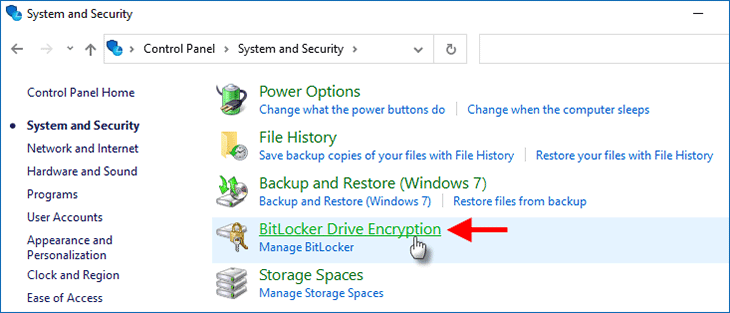
Bước 1: Mở Control Panel và chuyển đến System and Security > BitLocker Drive Encryption.
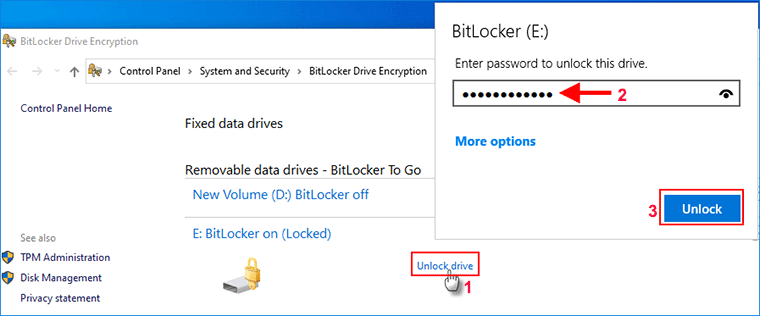
Bước 2: Trên bảng BitLocker Drive Encryption, xác định vị trí ổ đĩa đã bật BitLocker, sau đó nhấp vào Unlock drive. Tương tự, một cửa sổ BitLocker nhỏ sẽ hiển thị. Chỉ cần nhập mật khẩu BitLocker hoặc khóa khôi phục của bạn, sau đó nhấp vào Unlock để mở khóa ổ đĩa.
Cách 3: Mở khóa ổ cứng được mã hóa BitLocker bằng BitLocker Reader
iSumsoft BitLocker Reader là tùy chọn của bên thứ ba cho phép bạn dễ dàng bật / tắt và quản lý mã hóa BitLocker trên ổ đĩa của mình. Trong trường hợp Mã hóa ổ đĩa BitLocker tích hợp trong Windows không thể khởi động hoặc ngừng hoạt động, công cụ này sẽ là một giải pháp thay thế tốt. Dưới đây là cách sử dụng công cụ để mở khóa ổ đĩa được mã hóa BitLocker trong Windows 10.
Bước 1: Tải xuống và cài đặt iSumsoft BitLocker Reader trên Windows 10. Sau khi cài đặt, hãy khởi chạy công cụ này.
Bước 2: Nhấp chuột phải vào ổ đĩa được mã hóa BitLocker và nhấp vào Unlock Drive.

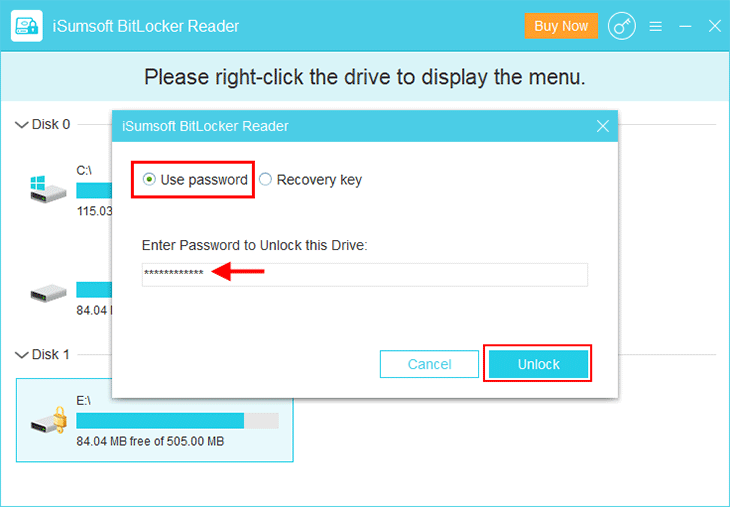
Bước 3: Một hộp thoại nhỏ mở ra. Chọn tùy chọn “Use password”, nhập mật khẩu BitLocker của bạn, sau đó nhấp vào Unlock. Tất nhiên, bạn cũng có thể chọn tùy chọn Khóa khôi phục, sau đó nhập khóa khôi phục của bạn để mở khóa ổ đĩa.
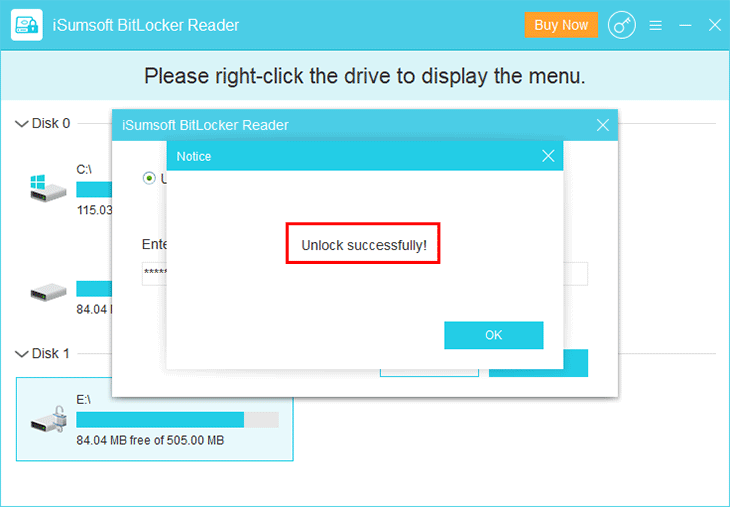
Bước 4: Ổ đĩa mã hóa BitLocker được mở khóa thành công và bạn có thể thoát khỏi công cụ.
Mẹo: iSumsoft BitLocker Reader cũng có phiên bản Mac giúp bạn mở khóa các ổ đĩa được mã hóa BitLocker trong macOS . Điều này rất hữu ích vì macOS không hỗ trợ BitLocker trong các trường hợp bình thường.
Cách 4: Mở khóa ổ đĩa được mã hóa BitLocker bằng Command Prompt
Bước 1: Nhập cmd vào hộp “Type here to search” ở bên trái của thanh tác vụ. Khi Command Prompt xuất hiện trong danh sách kết quả tìm kiếm, hãy nhấp chuột phải vào nó và chọn Run as administrator . Thao tác này sẽ mở Command Prompt với tư cách quản trị viên .

Bước 2: Trong cửa sổ Command Prompt, gõ manage-bde -unlock E: -password và nhấn Enter. Khi bạn được nhắc nhập mật khẩu để mở khóa tập này, hãy nhập mật khẩu chính xác của bạn và nhấn Enter. Ổ đĩa sẽ được mở khóa thành công.
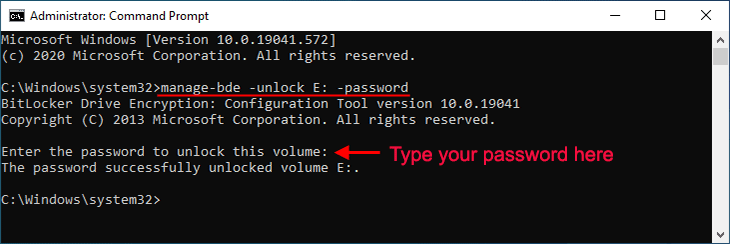
Lưu ý: Thay thế E bằng ký tự ổ đĩa của ổ đĩa được mã hóa BitLocker cần được mở khóa. Mật khẩu BitLocker bạn nhập trong cửa sổ Command Prompt là ẩn, vì vậy hãy đảm bảo bạn nhập chính xác.
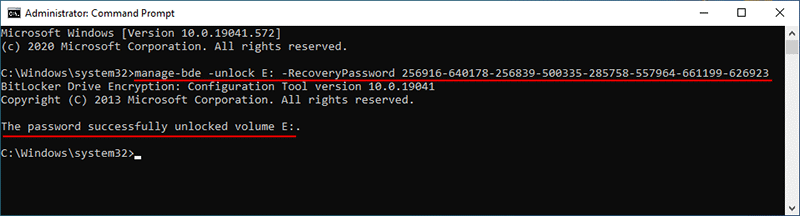
Nếu bạn muốn sử dụng khóa khôi phục của mình để mở khóa ổ đĩa, hãy nhập lệnh sau và nhấn Enter. Thay thế “ Your-BitLocker-Recovery-Key ” bằng khóa khôi phục BitLocker thực của bạn.
manage-bde -unlock E: -RecoveryPassword Your-BitLocker-Recovery-Key
Cách 5: Mở khóa ổ đĩa được mã hóa BitLocker bằng Windows PowerShell
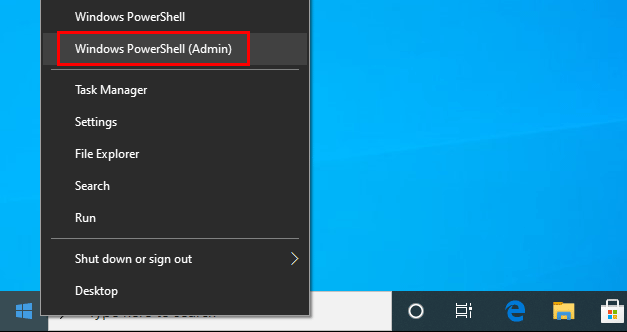
Bước 1: Nhấn Win + X và chọn Windows PowerShell (admin) từ menu.
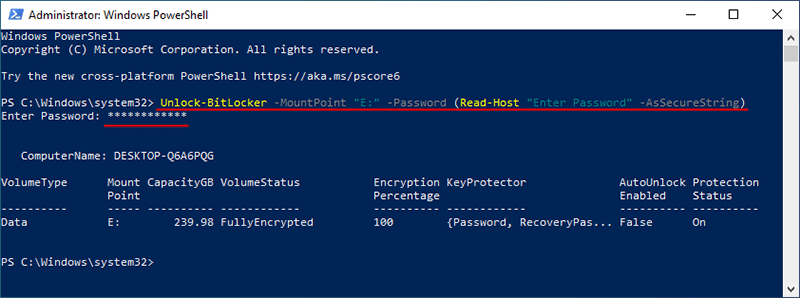
Bước 2: Trong cửa sổ PowerShell mở ra, nhập lệnh sau và nhấn Enter. Khi bạn được nhắc nhập mật khẩu, hãy nhập mật khẩu BitLocker chính xác của bạn và nhấn Enter. Ổ đĩa sẽ được mở khóa thành công.
Unlock-BitLocker -MountPoint “E:” -Password (Read-Host “Enter Password” -AsSecureString)
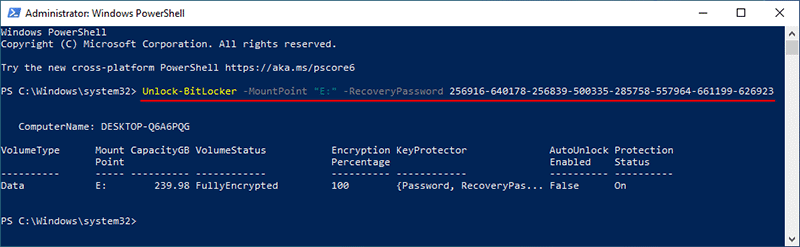
Nếu bạn muốn sử dụng khóa khôi phục BitLocker của mình để mở khóa ổ đĩa, hãy nhập lệnh sau và nhấn Enter. Thay thế “Your_BitLocker_Recovery_Key” bằng khóa khôi phục thực tế của bạn.
Unlock-BitLocker -MountPoint “E:” -RecoveryPassword Your_BitLocker_Recovery_Key
Chúc các bạn thành công.
OpenCL BitLocker
BitLocker is a full-disk encryption feature available in recent Windows versions (Vista, 7, 8.1 and 10) Ultimate, Pro and Enterprise.
BitLocker-OpenCL format attacks memory units encrypted using the User Password (see the following picture) or the Recovery Password authentication methods.
Our attack has been tested on several memory devices encrypted with BitLocker on Windows 7, 8.1 and 10 (both compatible and not compatible mode).
You can find the standalone CUDA implementation here: https://github.com/e-ago/bitcracker
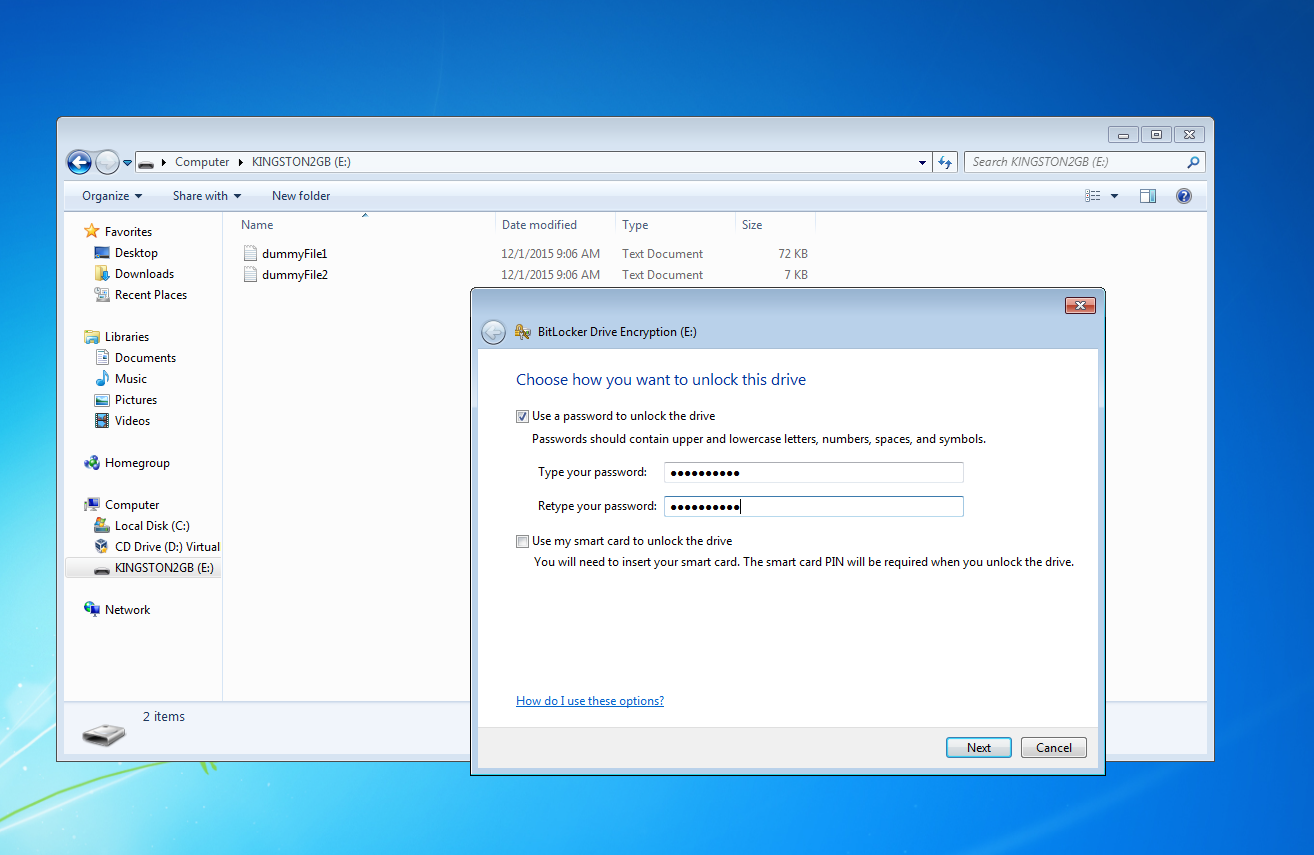
User Password authentication method
With this authentication method, the user can choose to encrypt a memory device by means of a password.
To find the password used during the encryption, see Step 2: Extract the hash
Recovery Password authentication method
During the encryption of a memory device, (regardless the authentication method) BitLocker asks the user to store somewhere a Recovery Password that can be used to restore the access to the encrypted memory unit in the event that she/he can’t unlock the drive normally. Thus the Recovery Password is a common factor for all the authentication methods and it consists of a 48-digit key like this:
236808-089419-192665-495704-618299-073414-538373-542366
To find the correct Recovery Password, see Step 2: Extract the hash. For further details, see also Microsoft docs.
Step 1: Get the image of your encrypted memory device
In order to start the attack, you need to extract the image of your memory device encrypted with BitLocker. For example, you can use the dd command:
sudo dd if=/dev/disk2 of=/path/to/imageEncrypted conv=noerror,sync
4030464+0 records in
4030464+0 records out
2063597568 bytes transferred in 292.749849 secs (7049013 bytes/sec)
Step 2: Extract the hash
In order to use the BitLocker-OpenCL format, you must produce a well-formatted hash of your encrypted image. Use the bitlocker2john tool (john repo) to extract the hash from the password protected BitLocker encrypted volumes.
$ ../run/bitlocker2john -i /path/to/imageEncrypted
Opening file /path/to/imageEncrypted

Signature found at 0x00010003
Version: 8
Invalid version, looking for a signature with valid version...

Signature found at 0x02110000
Version: 2 (Windows 7 or later)

VMK entry found at 0x021100d2
VMK encrypted with user password found!
VMK encrypted with AES-CCM

VMK entry found at 0x021101b2
VMK encrypted with Recovery key found!
VMK encrypted with AES-CCM

$bitlocker$0$16$a149a1c91be871e9783f51b59fd9db88$1048576$12$b0adb333606cd30103000000$60$c1633c8f7eb721ff42e3c29c3daea6da0189198af15161975f8d00b8933681d93edc7e63f36b917cdb73285f889b9bb37462a40c1f8c7857eddf2f0e
$bitlocker$1$16$a149a1c91be871e9783f51b59fd9db88$1048576$12$b0adb333606cd30103000000$60$c1633c8f7eb721ff42e3c29c3daea6da0189198af15161975f8d00b8933681d93edc7e63f36b917cdb73285f889b9bb37462a40c1f8c7857eddf2f0e
$bitlocker$2$16$2f8c9fbd1ed2c1f4f034824f418f270b$1048576$12$b0adb333606cd30106000000$60$8323c561e4ef83609aa9aa409ec5af460d784ce3f836e06cec26eed1413667c94a2f6d4f93d860575498aa7ccdc43a964f47077239998feb0303105d
$bitlocker$3$16$2f8c9fbd1ed2c1f4f034824f418f270b$1048576$12$b0adb333606cd30106000000$60$8323c561e4ef83609aa9aa409ec5af460d784ce3f836e06cec26eed1413667c94a2f6d4f93d860575498aa7ccdc43a964f47077239998feb0303105d
As shown in the example, it returns 4 output hashes with different prefix:
- If the device was encrypted using the User Password authentication method, bitlocker2john prints those 2 hashes:
- $bitlocker$0$… : it starts the User Password fast attack mode (see User Password Section)
- $bitlocker$1$… : it starts the User Password attack mode with MAC verification (slower execution, no false positives)
- In any case, bitlocker2john prints those 2 hashes:
- $bitlocker$2$… : it starts the Recovery Password fast attack mode (see Recovery Password Section)
- $bitlocker$3$… : it starts the Recovery Password attack mode with MAC verification (slower execution, no false positives)
Samples BitLocker images for testing are available here:
Step 3: Attack!
Use the BitLocker-OpenCL format specifying the hash file:
./john --format=bitlocker-opencl --wordlist=wordlist target_hash
Currently, this format is able to evaluate passwords having length between 8 (minimum password length) and 55 characters (implementation reasons). We will increase the max passwords size in the next release.
The mask you can use to generate Recovery Password is:
-mask=?d?d?d?d?d?d[-]?d?d?d?d?d?d[-]?d?d?d?d?d?d[-]?d?d?d?d?d?d[-]?d?d?d?d?d?d[-]?d?d?d?d?d?d[-]?d?d?d?d?d?d[-]?d?d?d?d?d?d
Samples of User Password/Recovery Passwords dictionaries you can user are available here: https://github.com/e-ago/bitcracker/tree/master/Dictionary
Output
An output example is:
./john --format=bitlocker-opencl --wordlist=wordlist hash
Device 0: Tesla K80
Using default input encoding: UTF-8
Loaded 1 password hash (bitlocker-opencl [SHA-256 AES OpenCL])
Note: minimum length forced to 8
Press 'q' or Ctrl-C to abort, almost any other key for status
password@123 (?)
This OpenCL implementation has been tested on a GPU NVIDIA GeForce Titan X (Openwall), GPU AMD Radeon HD 7990 Malta and an Intel Core i7 CPU. For additional information about performance, see https://github.com/e-ago/bitcracker#performance
Updates and changelog
12/19/2017
- Now BitLocker-OpenCL supports 4 different attack modes: User Password fast attack, User Password with MAC verification (performance decreased), Recovery Password, Recovery Password with MAC verification (performance decreased)
- Max password length increased to 55
Next Update:
- Provide a Recovery Password dictionary
References, license and contacts
BitCracker OpenCL version developed by Elenago <elena dot ago at gmail dot com> in 2015
Copyright © 2015-2017 Elenago and Massimo Bernaschi (National Research Council of Italy), <massimo dot bernaschi at gmail dot com>
Licensed under GPLv2
You can find the standalone CUDA implementation here: https://github.com/e-ago/bitcracker
This is a research project; for any additional info or to report any bug please contact <elena dot ago at gmail dot com>